Thursday, October 29, 2009

Happy Howl-oween

Before you look at pictures, let me fix explain that I normally do not like clothes on dogs - any animal for that matter. My dog does have a sweater because she goes a little crazy if she doesn't get her walks, even in sub-zero Iowa winters. The other piece of information you need was this was not a dog costume, so I guess that makes it a little more OK :\


My oldest daughter needs to dress up for Halloween for her job. She went shopping and found a great costume, except it was a vampire costume. Now I'm all for Halloween fun, but I don't let my girls dress on the darker/demonic side. So Colie is going as an upper class victorian era lady - dressed in black and red velvet. The collar is now the dogs costume ... for as long as she lets it stay on

beautiful red (plastic) gem in the brooch don't you think


Kind of looks like the cone of shame from Up. She tries to get it off as if it were too :) The soft velvety black actually does match her coat pretty well, tho.

So here are both of the girls dressed up for a party

Pretty cute huh!

My youngest found a witch costume (also off limits) but the cut of it looks a lot like Lucinda from Ella Enchanted - fairies are OK - so thats who she will be, with all the glitter and glitz that goes with fairie-hood. No pix of her yet, but I'm sure I'll snap a few once she is in full fairie regalia

Thanks for stopping by

Saturday, October 24, 2009

October Blog Hop


Its blog hop time at Papertrey and this month's theme is holiday cards, gifts, wrap, whatever.  If its holiday then bring it on!

I used one of the new My Timeless Templates (Cash or Charge Trio) to make a gift card holder. 


I love Heathers new patterned paper and thought the red, chocolate and kraft went well together.  I stamped the snowman in versamark and the face and arms in chocolate chip craft ink.  Then I heat embossed with clear EP.

I sponged a little spring rain ink around the snowman to make him stand out.  I also stamped the snow flake strip from Holiday Tree across the flap in red along with different dots from Polka Dot Basics in fresh snow.

The little bow detail followed Nichole Heady's tutorial in this post.  I used a vintage wood button with the rough side turned out and tied with rustic twine

Thanks for stopping by.  Enjoy the rest of the hop!

{Gift Card Holder supplies}
Ink: (SU!) Chocolate Chip craft, Real Red craft, (PTI) Fresh Snow, Spring Rain
Paper: (PTI) Kraft, Vintage Cream, Rustic Snowflakes, Dark Chocolate
Stamps: Holiday Tree, Polka Dot Basics
Tools: My Timeless Templates - Cash or Charge trio
Embellies: (SU!) chocolate twill, (PTI) vintage wood button, rustic button twine

Friday, October 23, 2009

Thank You for Helping

I'm not sure if I mentioned it before by my eldest (soon to be 17 year old) daughter is going on a People to People student ambassador trip next summer.  She will be spending 15 days in Australia (I know, right  - I'm jealous too! :o)

Right now we are in fundraising mode ... and we've been having a bake sale every day of October at my office building.  Several people I work with have been kind enough to bring in baked goods so I haven't had to do all the work (or should I say my kitchen - my daughter is baking when she is at my house).  I made these cards for Colie to give to them to thank them for the help.


This card is a CASE from Nichole Heady during the sneak peeks at the PTI release this month.  Its one of the ones that sold me on this set.  I love the font and the size of the sentiment ... if I did my math right, that diamond layer is about 4" across making the sentiment about 3.5" (I'm sure I could have just looked it up on the website, but doing square roots is more fun - engineer remember :o)

The embossing folder is Finial Press from SU!  I thought it went really well with the Giga Guidelines image. 

The sentiment is stamped in chocolate chip.  The GGL image is rock and rolled in pumpkin pie and ruby red, then stamped off once to lighten it up


Thanks for stopping by!

{Thank you card supplies}
Stamps: Giga Guidelines (PTI)
Ink: Chocolate chip, Pumpkin Pie, Ruby Red (SU!)
Paper: Vintage Cream (PTI)
Tools: Finial Press embossing folder (for SU! by Sizzix), Big Shot

Thursday, October 22, 2009

Raspberry Suite Color Challenge

I'm so excited that I actually have time to play this time around.   I need to make a going away gift for a coworker.  She is a contractor and is heading home tomorrow.  I thought one of the new PTI notepads would make a nice gift.

I also read through Betsy Veldman's interview on Papercraft Connection.  One of the blogs that inspired her was Print & Pattern  I looked out there today and found the most amazing fabric - its the first towel ... with the butterflies.

So combining my new inspiration spot with one of my fave inspiration spots, I came up with this


I used Nichole Heady's free download template for the notepad cover.  I changed the color scheme from the towel to match Dawn's color challenge.

The butterfly is cut & then embossed using the set I found at Sam's Club Online (best Sam's Club purchase ever - except maybe my Nikon!)  I used raspberry fizz bitty box paper, and then lightly sanded the embossing to make it stand out even more.  I lined the body with clear rhinestones colored with my RV17 Copic.


 The swirls are from Fancy Flourishes.  The sentiment and rectangle border are from Take Note.  I also added a row of rhinestones at the top.  These were colored with Copic E59.


For the closure I used pop dots and vintage chocolate buttons on the front and back.  I twisted some twine around them loosely enough to get it off easily, but tight enough to hold it.

Inside I stamped tiny Polka Dots in vintage cream and lined the pocket with more bitty box paper.


Thanks for stopping by!

{Altered Notepad supplies - PTI unless noted}
Stamps: Take Note, Fancy Flourishes, Polka Dot Basics
Ink: Chocolate Chip, Garden Green (SU!),  Vintage Cream
Paper: Kraft, Vintage Cream, Bitty Box patterned, Paper Basics note pad
Tools: Butterfly diecut/emboss, Copics - E59, RV17
Embellies: Rhinestones, vintage buttons, chocolate grosgrain ribbon (SU!)

Wednesday, October 21, 2009

Baby Love - sock monkey style!

A good friend of mine asked me to make a card for her son and daughter in law's baby shower.  They don't know the sex of the baby, but they are planning to decorate the room in a monkey motif.  Now my friend knows my deep and abiding love of the sock monkey, so she asked me to use that stamp - in a gender neutral color palette.

So here is BaBY Love - sock monkey style --


I used the Sock Monkey from SU! and Polka Dot Basics, Mega Mixed Messages, and Heart Print Sentiments from PTI. 

The color scheme is spring moss and lemon tart (with the dark chocolate bitty dots thrown in for good measure)  I paper pieced Mr Monkey, cuz I think it brings out the best in him :o)


and used Spellbinders Tag Trio for the tag.  Its tied with rustic twine around that big ole lemon tart button

Thanks for stopping by!

{Baby Love card supplies}
Stamps: Sock Monkey (SU!), Polka Dot Basics & Mega Mixed Messages (BaBY) and Heart PRint Sentiments (Love) (PTI)
Ink: Spring Moss & Ripe Avocado (PTI), Tuxedo Black, Barely Banana (SU!)
Paper: (PTI) Spring Moss, Lemon Tart, Bitty Dot patterned, White, Everyday Blessings patterned
Embellies:(PTI) Lemon Tart vintage buttons, spring moss stitched ribbon, rustic twine

Tuesday, October 20, 2009

The OWH Box

Here it is in all its glory ... the box going to Operation Write Home from my party on Saturday


Thanks to everyone who came over to stamp!  I love stamping, but its so much more fun when you can chat with friends.

This box of over 100 cards will be shipping out this week, in time to make the Nov 1 deadline for Operation Write Home

Thanks for stopping by!

OWH Card 2

Here is another simple card from my Operation Write Home card party


I've been seeing the vellum CS snow hills all over the 'net this last week.  Love the look!  and thought the flaky snow men from Flaky Friends was the perfect image to go with it!


Thanks for stopping by!

{Snowmen card supplies}
Stamps (SU!) Flaky Friends, (PTI) Signature Christmas
Ink: Momento TUxedo Black, Balet Blue (SU!)
Paper: White, vellum (PTI)
Color medium: Copic Sketch markers

Monday, October 19, 2009

OWH Card 1

I designed 4 simple cards for my Operation Write Home Christmas Card Party.  Here is the first one ... a single layer simple layout but it gets the point across, don't you think?


I used Rustic Branches and Signature Christmas from PTI


Thanks for stopping by!

{Happy Holidays Card Supplies}
Stamps: (PTI) Rustic Branches, Signature Christmas
Ink: (SU!) Real Red, Old Olive, Kiwi Kiss
Paper: White

Sunday, October 18, 2009

Operation Write Home Christmas Card Party!

Last night  I invited friends from work and church over to make Christmas cards for Operation Write Home.  We had a grand time just hanging out and stamping.

Seven friends came over.  Several others were going to try and make it but sick kids got in the way (darn cold & flu season any way!)

I planned on taking pix of everyone stamping and I got so caught up in chatting that I completely forgot to.  Here are a couple of the cards we made though


I cut for 20 people and most of the cards got made so I'll be adding 80 more cards to my OWH box that will ship out this week.  I'll add a post with the box later in the week.

Thanks! for stopping by

Birthday Card #2

And for today I have this birthday card ... its for my SIL.


I used the largest flourish from Fancy Flourishes and the autumn wreath from Autumn Tags 2009.  The sentiment is from Damask Designs

I embossed the wreath with clear EP and then colored with orangie/yellow Copics


Thanks for stopping by!

{Supplies}
Stamps: (PTI) Fancy Flourishes, Autumn Tags 2009, Damask Designs
Ink: (SU!) Chocolate Chip craft
Color Medium: various Copics
Other: Clear Embossing powder

Friday, October 16, 2009

Birthday Card Blitz

All the cards I have left are birthday cards ... I had 4 birthdays in a 2 week period.  I actually forgot to take pix of a couple so we'll have to make due with what I did get.  So without further ado, birthday card #1:


This one is for my brother.  I did the polished stone technique using Old Olive, Always Artichoke and copper metallic.

I stamped the trees and geese in Jet Black Staz-on and the sentiment in Not Quite Navy.

I love this  technique!  Especially where the metallic bits are ... so shiny!


Thanks for stopping by!

{Supplies}
Stamps: Around and About Sentiments (PTI), Pines (SU! retired)
Ink: (SU!) Old Olive, Always Artichoke, copper (retired), Black Stazon
Paper: Glossy white, Not Quite Navy, White (SU!)

Thursday, October 15, 2009

Anniversary Card #2

Here is the other anniversay card I made for my "card blitz week"  This one is for my brother and sister-in-law.  They are celebrating 22 years of wedded bliss this year.


I got the idea from a SU! demonstrators meeting I went to a few months back.  I ran a piece kraft CS through my Xyron to make it into a "sticker sheet".  I placed 1" squares of patterned paper on it leaving a gap for the "grout"  You could use odd shaped pieces too, to give a more broken tile mosaic look to it. 

After the paper was in place I covered it with vanilla embossing powder, tapped off the excess and heat set it.


The butterfly is a Sizzix die/embossing combination I found at Sam's Club online.  The center is black rhinestones from PTI.

Thanks for stopping by!

{Supplies}
Stamps: Damask Designs (PTI)
Ink: Basic Gray (SU!)
Paper: Kraft, Nouveau Chic DSP, Basic Gray (SU!)
Tools: Butterfly die/emboss (Sizzix), vanilla EP (SU! retired)
Embellies: Rhinestones (PTI)

Tuesday, October 13, 2009

Card Blitz - Anniversary #1

The first few weeks in October always turn into a card blitz for me - I have 4 birthdays and 2 anniversaries to make cards for in a 2 week period.  I know its coming every year, and every year I wait til the last minute :/

Here is anniversary card #1.  Its for my Aunt and Uncle who are celebrating their 66th anniversay this year (amazing huh!!)


I used Damask Designs and one of the flourishes from Vintage Labels to create this card.  The rhinestone line was all connected (I don't think I would have the patience to place those all individually!  :o)

Thanks for stopping by!

{Supplies}
Stamps: Damask Designs, Vintage Labels (PTI)
Ink: Night of Navy (SU!), Fresh Snow (PTI)
Paper: Bordering Blue, Cight of Navy (SU!)
Embellies: rhinestones

Sunday, October 11, 2009

New Baby

My eldest daughter's best friend (for the last 10 years or so) has a new baby sister!  My DD calls her "her baby sister in spirit" since her BFF is like another daughter to me.  We're so excited.

We made this card for the blessed event


The stroller is paper pieced with bitty dots in sweet blush.  Had to have a little bling for the darling little girl so I covers the dots on the cover of the stroller with rhinestones.


Thanks for stopping by!

{Supplies}
Stamps: Fast and Fun Notes (SU!)
Ink: Basic Black, Pink Passion marker for spritzing (SU!)
Paper:Sweet Blush, Raspberry Fizz,  white, bitty dots pattern in sweet blush (PTI),
Tools: color spritzer
Embellies: rhinestones, sweet blush dotted satin ribbon (PTI)

Saturday, October 10, 2009

Birthday Cutout

Today I have a simple little birthday card for you.


I used the swiss dot CB embossing folder, and a large square nestability on the card base.

The focal layer was mounted on the inside of the card. 


For the button centers I acutally split the ribbon in half to make it thinner before trying to tie it.  I thought it would help it lay a little flatter


Thanks for stopping by!

{Supplies}
Stamps: Fast and Fun Notes (SU!)
Ink: Tuxedo Black
Paper: White, Raspberry Fizz (PTI)
Color Medium: Copics, chalks
Embellies: Raspberry Fizz vintage buttons, Raspberry Fizz dotted satin ribbon

Saturday, October 3, 2009

World Card Making Day


Happy World Card Making Day to you!!!

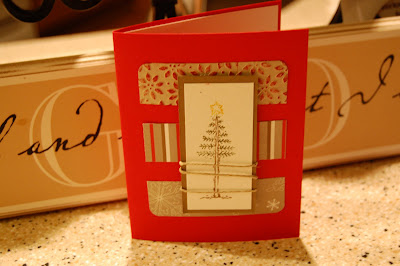
I'm not sure I'll have time to craft today as I will be taking a road trip to visit a friend who moved away about a month ago. But here is a card I did get made a few days ago out of just some scraps that were laying around on my work bench.


I used bits of the SU! Christmas Cocoa specialty paper and some leftover pieces of kraft CS that had been run through my Biug Shot with the Petals-a-plenty embossing folder.

The tree is from Flaky Friends


Inside I ran a strip of the embossed paper as well to tie it all together


For more World Card Making Day inspiration check out Moxie Fab World and PaperCrafts Connection online for inspiration and a contest or two.

Most of the designers listed on the right side are also participating, so get inspired!

And while you are making cards, remember Operation Write Home

Have a happy card-making day!