Monday, August 31, 2009

Birthday Wishes

I have a sweet, easy birthday card for you today. 

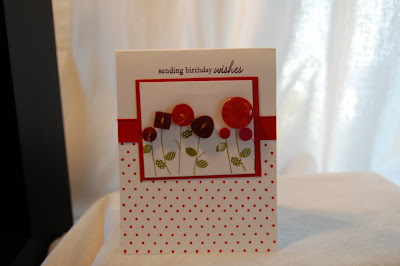
I used my Everyday Button Bits for the flower stems and an assortment of PTI vintage buttons in Pure Poppy, Scarlet Jewel and Raspberry Fizz for the flowers.  It was a lot of fun sorting through all the different buttons finding ones that were just right!
I love the simple background from  Polka Dot Basics and the texture and dimension the buttons give it
Thanks for stopping by!
{Birthday Wishes supplies}
Stamps:(PTI) Everyday Button Bits, Polka Dot Basics
Paper: (PTI) White, Pure Poppy
Ink: (SU!) Old Olive, Real Red
Embellies: Real Red grosgrain (SU!), buttonsm (PTI)

Monday, August 17, 2009

On My Couch

I love Lisa's On My Couch set from the July Papertrey release. 

And I love red ...

I love how easy it is to create a scene with this set and its companion On My Couch Additions
I added some shadowing with my R59 Copic.
The flowers are pearlized straight pins, that I bent up into a stem/leaf shape  and adhered in place using Crystal Effects.  I stamped and colored the vase & stems first.

Thanks for stopping by!

On My Couch Card supplies - PTI unless noted}
Stamps: On My Couch, On My Couch Additons
Ink: (All SU!) Real Red, Chocolate Chip, Creamy Caramel
Paper: Pure Poppy, Dark Chocolate, White
Tools: pliers, Copic R59, YG97, Crystal Effects
Embellies: Pure Poppy dotrted satin ribbon, straight pins, clear rhinestone (pillow)

Friday, August 14, 2009

That Seventies Card

Remember these?
I was looking for a picture that had more ball like ends to the points, but couldn't find one.  I remember seeing these all over growing up - whether it was in the den at a friends house (yes they really had a "den") or on the Brady Bunch.  WIth Dawn's new Mod Squad set I just felt like I had to make this starburst into a card!

To make the starburst, I first stamped the circle then inked the stars from the circle with a marker and stamped again.  I punched that out, then also punched a coordinating blue layer and adhered them together.
To get the starburst pattern I grabbed a whole lotta straight pins with blue, black and white heads.  I laid my punched layer upside down on my circle coluzzle template and smeared a bunch of Crystal Effects on the back.  I then laid the pins into the CE, making sure the head of the pin was aligned with the circle of the coluzzle
(sorry I had to use my phone for this one ... the Nikon was out of commission)
I layered the starburst over some ribbon and the stamped front layer.
I stamped the star multiple times (1st & 2nd generation inking) in blue and brown, with one of the great sentiments from the set.
Inside I stamped those cute flowers.
and on the back - the Cards For Heroes logo/website
Thanks for stopping by!
{Just Because card supplies - all PTI unless noted}
Stamps: Mod Squad, CFH logo (Imagine Stamps)
Ink: (SU!) Brocade Blue, Chocolate Chip, Always Artichoke, (PTI) Fresh Snow
Paper: Dark Chocolate, White
Tools: Crystal Effects
Embellies: Straight pins, brown, light blue & navy grosgrain (SU!)

Wednesday, August 12, 2009

Paper Roses

I love Dawn McVey's Paper Flowers ... they are just so cute.  So today I made a paper rose - its stand s up a little more than the regular flowers.

I create a match box just guessing the sizes for things (I only had to remake the cover once so I was pretty happy about that!  :o)

I used SU! Bella Rose and PTI Scarlett Jewell - they just go so lovely together!

I love that little bit of Kiwi Kiss polka dot peeking out from the inside so much I used the same paper for the leaves - which were punched out using the wide oval punch.
To make the flower I used 4 pieces of scrap, cut 1/4" to 1/2" difference between layers (my largest was 3" and smallest was  2").  I tore them into rough circle shapes and then instead of curling them, I poked my finger into the middle and crumpled the paper up around it.  This gave it more of a cupped appearance.
I used a large vanilla brad for the flower center and colored it using my R59 Copic.  I tried to leave brush strokes in it so it would look more like the bud in the center of a rose.  To set the rose off a bit from the rest of the box, I edged each layer with distress ink.
I am going to tuck some dark chocolate into it as a going away gift for a friend.
Thanks for stopping by!!

{Bella Rose Match Box  - Supplies}
Stamps: None
Ink: Tim Holtz Distress Ink - Antique Linen
Paper: Bella Rose (SU!), Scarlett Jewel (PTI)
Tools: Copic:R59, wide oval punch(SU!)
Embellies: Large vanilla brad(SU!), scarlett jewell satin & satin bitty dotted ribbon (PTI)

Tuesday, August 11, 2009

CFH - Mini Blog Hop

Cards for Heroes is having a mini blog hop on August 16.  The theme is Holidays for Heroes. 

If you are a crafter you can get in on all the fun ... holdiay cards can be sent in until Nov. 1.   Check out the Cards For Heroes website for shipping and cardmaking instructions.

If you are following the chain, you came here from Loni H.'s blogIsn't that tree gorgeous!!!
I wanted to share a the holiday card I made:

The technique I wanted to share is "faux postage".  I used a nestability rectangular die as my mask, but you can also make you own out of clear acetate - just draw out the size of the cardstock you are using for your stamp on the acetate and then draw another shape 1/4" inside the first mark.  Cut away the interior and voila - instant (or almost instant) mask!!
I stamped the end of the holly berry branch on the faux stamp CS , drew the outline using a marker and the nestie as a guide, and also sponged with my nestie mask in place, then I trimmed with a Fiskars postage decorative scissors
I also wanted to give a shout out to all the service men & women and their families.  Thank you so much for the sacrifices you make on a daily basis to serve & protect us at home.  Making cards seems like such a small thing and doesn't really convey the appreciation I have for all of you.

ETA:  The red & white paper on the bottom is the new Stampin Up! Christmas Cocoa Specialty paper.  The white is actually flocked so it is velvety to the touch.


Enjoy the hop and be inspired ...

Your next stop is on the hop is     >>>>>>    Sandy A's Blog    <<<<<<

If you have trouble with this link, go to the Cards For Heroes Blog Hop site and look for the blog hop list on the right


{Make Merry Supplies - all ink, paper stamps & embellies by  SU!)
Stamps:  Berry Christmas
Ink: Chocolate Chip, Handsome Hunter, Real Red
Paper: Kraft, Cocoa Specialty, Ral Red, White
Tools: Fiskar Postage Stamp scissors, nestability rectangular die
Embellies: Dusty Durango dotted grosgrain ribbon, Chocolate chip grosgrain ribbon

Monday, August 10, 2009

A Note of Thanks

I got my new SU! order while I was on vaction so I got to ink up my new stamps right away!  Wahoo!!!

I've had my eye in the medallion stamp since I first saw and and I finally could order it.

I thought the Crushed Curry against the white would look vintage-y and fall-ish all at the same time.  I have a demo meeting coming up in September and want to use this one as a Workshop make and take because it really is pretty easy to put together
I punchout a 2" circle of the crushed curry and layered it with the  punched out center of the medallion.  I finished up that focal piece with a circle fire rhinestone brad.
The sentiment is from Thank You Kindly
Thank you kindly for stopping by!!
{Note of Thanks Supplies - all SU!}
Stamps: Medallion, Thank You Kindly
Ink: Crushed Curry, Soft Suede
Paper: White, Crushed Curry
Embellies: Fire circle rhinestone brad, crushed curry dotted grosgrain ribbon

Sunday, August 9, 2009

By My Side

While I was on vacation last week I set a goal to make 2-3 cards each day, which I will send in my next Cards For Heroes package.  I am trying to use different sets each time so I rediscover some of the stamps that are filling up my craft room.

I haven't used my On My Couch set much yet so I thought I should do one with that - since it has such a cozy feel to it.

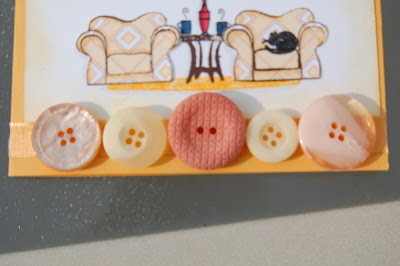
Isn't that a cozy scene!  I paper pieced the chairs using Father Knows Best patterned paper.  I built the rest of the scene from the On My Couch and On My Couch Additions.  I also colored the lamp and mugs with my Copics and softened the edges with Tim Holtz Distress Ink in Antique Linen.
I added a strip of Summer Sunrise satin ribbon and vintage buttons in Summer Sunrise and Lemon Tart to the bottom of the card.
The sentiment is the perfect finishing thought for this card
Thanks for stopping by!
{By My Side card supplies - All PTI unless noted}
Stamps: On My Couch, On My Couch Additions
Paper: Summer Sunrise, White
Ink: Momento Tuxedo Black, Timber Brown Stazon, Summer Sun Craft Ink (SU)Tim Holtz Distress Ink - Antique Linen
Tools Copics: R24, R29, YG93, YG95, B97, B99
Embellies: Summer Sunrise satin ribbon, Vintage buttons Summer Sunrise & Lemon Tart

Saturday, August 8, 2009

Pink & Black

Isn't pink & black the coolest color combo ever!?!  My girls love it (even the pink-o-phobe!) 

I stamped the Damask Designs in Black over Pink Passion and then sponged the edges in black to soften it up a little and make the Pink a spotlight in the center of the card.
The sentiment is from Heart Print Sentiments.  I thought this was perfect for a Cards For Heroes card ... since they are so far away from both friends and family.
Thanks for stopping by.
{Wings to the Heart card supplies}
Stamps: (PTI) Damask Designs, Heart Prints Sentiments
Ink: (SU!) Black
Paper: (SU!) White, Basic Black, Pink Passion
Embellies: (PTI) Black vintage buttons, Raspberry Fizz dotted satin ribbon

Friday, August 7, 2009

Adventures in Flower Soft

While I was shopping with my youngest recently at the local Scrap store, I happened upon Flower Soft.  I've been eyeing this for a while now and always stopped myself from ordering online because "I wasn't getting anything else" from that retailer.  So now I'm in line with paper and stickers and there is the flower soft ... and glue ... in such pretty colors.  I did limit myself to ivory and lavender :o)
I thought Lisa's Life set would be the perfect first card with it ...

Its just so cool ... and fuzzy!

Thanks for stopping by!

{Life card supplies - all PTI unless noted}
Stamps: Life, Guidelines 2
Ink: Elegant Eggplant, Lavender Lace, Mellow Moss (SU!)
Paper: Guidelines, White (PTI) , Elegant Eggplant , Lavendar Lace (SU!)
Tools: Copic V06
Embellies: Black gingham ribbon

Thursday, August 6, 2009

Farewell Friends

I have a couple of friends who are moving this week - one back to Texas and one just a couple of hours away.  While these moves represent opportunities for my friends, I will still miss them.  I thought I would give them a farewell gift at the going away dinner

I started with the My Timeless Template Captured Card Case.  One thing I love about the templates is that you can download them right away (no waiting for a box from Mr. UPS!)  I bought this template specificially for this project, but know I will use it in the future (like to house little goodies for my nieces and nephews at Christmas!)
Here is a picture to get a better idea of size:
I also made charms / decorations out of polyshrink.  The key chain is the large scalloped circle Sizzix die  and the butterflies were made from the Beautiful Butterflies die - both from SU!


I did learn that while the polyshrink material is still warm, its flexible - so I gave a little upward curve to the butterfly wings. 

I also made a set of 6 matching cards for the inside

Thanks for stopping by!
{Daisy card case and Cards}
Stamps: Upsy Daisy (SU!), B&C: Circles, Trajan Monogram Alpha (PTI)
Ink: Enchanted Eveing (PTI)
Paper: White, Enchanted Evening (PTI), Kraft
Tools: Polyshrink & heat gun, jump rings, circle punches, Scalloped Circle Sizzix die
Embellies: Enchanted Evening stitched grosgrain
{Butterfly Card Case & Cards}
Stamps: Wonderful You (SU!), Vintage Picnic Sentiments (PTI), Fancy Flourishes (polyshrink)
Ink: Plum Puddding (PTI)
Paper: Plum Pudding (PTI), Vanilla, Bitty Dots Plum Pudding
Tools: Polyshrink & heat gun, Beautiful Butterflies Sizzix die (SU!)
Embellies: Plum Pudding satin ribbon
Wednesday, August 5, 2009

Monochrome Butterflies

Several months ago I was at the scrapbook store and discovered they sell the Core'dinations paper - if you've never heard of it, check it out.  Its got a different color core than the paper color.  When you sand down a little, the core color shows.  Its super awesome-tastic!
So today when I was out with my youngest we decided to stop by - just to look.  We ended up getting not only the Core'dination paper in purple, but she got some stickers and paper for a volleyball scrap book,  we sat in on a free polyshrink make and take - and bought some polyshrink too!   I'm sure you'll see a charm or 2 in the near future on the blog. 
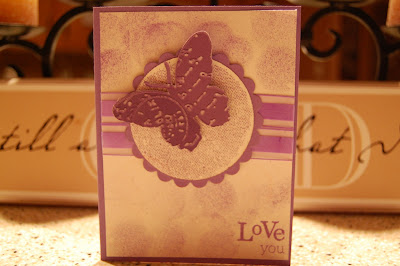
But for now, I used my new tag team CB die (its a die for cutting and 4 embossing folders that match the diecut shape - got it at Sam's Club Online - I know - who knew!)
Cool huh!  I lightly sanded the embossed part  - see the core color.  I know, right - cool.  I made it a monochrome lilac theme - paper, dyed ribbon  and ink
Thanks for stopping!
{Love you supplies}
Stamps: Mega Mixed Messages, Friends til the End (PTI), Linen BG (SU!)
Ink: (SU!) Lovely Lilac
Tools: Nestabilities Circle & Scalloped Circle, sponge daubers
Embellies: Ribbon (SU!) White satin ribbon (dyed with Lovely Lilac reinker)

Tuesday, August 4, 2009

Who Loves Ya Baby

I wanted to play with my new PTI stamps as soon as I got them, but I wasn't able to play with everything before life caught up with me.  I finally inked up my Mod Squad set from Dawn McVey - gotta say I love it.  It's fun and funky.  I also have a goal of making at least a couple of cards per day for the next week while I am on vacation.  I want to build up a Cards for Heroes stash for the next shipment

So here's my Mod card:
Along with the brown and orange, I pulled out the avocado green and harvest gold of my youth - lol! 
I stamped the small blocks image in chocolate to make the background and  popped the sentiment up just to give it a little dimension

I love the ribbon detail - I've used it to edge table decorations before, but I thought it went super with the 70s vibe!
The funky flowers in the set are so cool too - they just screamed "make me orange" when I got them out of the case :o)
Thanks for stopping by!
{Love Ya card supplies}
Stamps: (PTI) Mod Squad
Ink: (SU!) Only Orange, Chocolate Chip, Always Artichoke
Paper: (PTI) Dark Chocolate, White, (SU!) Only ORange
Tools: Copics: Yg95, YG97, circle punches
Embellies: (SU!) Ribbon: chocolate, mustard, orange grosgrain

Monday, August 3, 2009

Pattern Mixing

The Papertrey Senior Design team this week unveiled their latest challenge - mixing patterns ... gasp!  Some people are so great at that (Dawn McVey comes readily to mind) but patterns intimidate me and mixing patterns down right terrifies me.

But the DT memebers are so great about sharing tips and techniques for making my own craft better that I thought I would give it a try.

Step 1 - Stop shaking ... its just paper :o)
Step 2 - I liked the tips from Wendy Sue about keeping the scale the same and the color palette similar.  I can do that

I decided for my venture into pattern I would stick with 2 colors (others suggest up to 5, but that makes my head spin lol!) - I used Ocean Tides and Ripe Avocado patterned papers from PTI (I've been steadily collecting the PTI patterned papers over the last 6 months so I have quite the Stash)

I mounted the squares on a pieces of Spring Moss and added a strip of chocolate twill .
I also used my new In Bloom set for the first time.  I love the images and how versatile they are - its not just another flower set.  The edges are super simple to trim so you can get that great layered look with  foam tape.  The leaves I stamped on some old newspaper (cute and "green"  how cool is that - besides text print  backgrounds are all the rage!)  I even found an ad header that had the same mossy green in it, so it coordinates too :o)
I also love the font in this set - the curliness of it is fantastic!
So maybe patterns aren't so scary any more ... but I'll take baby steps :o)  Here is the whole card:
This one will go in my stash for my next shipment to Cards For Heroes.  Check out this great organization that reaches out to encourage our troops.  If you have extra cards or just feel like making up a batch, keep them in mind.  For rules cards, check here.  Some things we don't think about can present a danger to a deployed soldier (glitter is one)
Thanks for stopping by!
{Friend card supplies - All PTI unless noted}
Stamps: In Bloom
Ink: (All SU!) Pink Passion, Chocolate Chip
Paper: Kraft, Raspberry Fizz,  Spring Moss, Bitty Dots (ocean tides) Tea Leaves (ripe avocado & ocean tides), Bitty Boxes (ripe avocado) and newspaper
Tools: Square punch, foam tape
Embellies: chocolate twill (SU!)