Thursday, May 7, 2009

Spotlighting

I was checking out Gina K's blog and she was talking about the "oldies but goodies" - that first stamping technique you learned that really helped you on your way to where you are now. One of the first things I learned was spotlighting - where you stamp in a monochrome dark neutral and then stamp again, cut out a piece and color it to really show off that particular area of the image.
I decided to do that with my latest SU! order. I thought the Branch Out set would be perfect for this.


I stamped the tree image in Chocolate Chip, making sure the the part of the tree I wanted to spotlight was what I stamped on my small square. I added some Kiwi Kiss and Old Olive "leaves" on the spot light image to give it a pop of color. This stamp set comes with a great "splatter" pattern stamp that I used for the leaves.
The spotlight image is adhered with a foam dimensional to set it off a little more.
I needed a simple thank you card so I added a sentiment from my other new stamp set - Flight of the Butterfly.

I added some butterfly groups in chocolate chip to the large image and 1 in Riding Hood Red to the spot light image ... it really jumps out atcha don't you think!


This card just reminds me of all the trees I see budding in my neighbor hood, now that we finally seem to be getting some spring time in Iowa!

Thanks for stopping by

{Thank You So Very Much card supplies - All SU!}
Stamps: Branch Out, Flight of the Butterfly (sentiment)
Ink: Chocolate Chip, Old Olive, Kiwi Kiss, Riding Hood Red
Paper: Kiwi Kiss textured, Chocolate Chip, white

Wednesday, May 6, 2009

Kristina Werner Color Inspiration Challenge

This is my first time trying the Kristina Werner's Color Inspiration Challenge


I love the brown and mustard but didn't know how I would work pink in. I really like how this turned out though. It was inspired by Dawn McVey's card here.


I used the Best Blossom SAB set from SU! for the leaves and pulled out my leafy branch CB embossing folder. The tone on tone embossing doesn't show up well in the photo, but the pattern is very similar to the stamped image IRL.

I decided to use my Friends til the End patterned paper in Hibiscus Burst and my new Bigz Beautiful Butterflies die from SU! I cut out a mustard color butterfly as well then stamped the Friends til the End blossom on it in chocolate.


I finished off the middles with vintage buttons from PTI tied with linen thread.


{Butterfly Card Supplies}
Stamps: Best Blossom (SU!)
Paper: White, Chocolate (SU!), Patterned (PTI)
Ink: Chocolate Chip (SU!)
Embellies: Buttons (PTI), Thread (SU!), Chocolate dotted swiss ribbon (PTI)
Tools: CB Embossing folder - Leafy Branch

Copic coloring

So I'm getting into coloring with Copic sketch markers. I really like the effects (makes it look like I almost know what I'm doing :o). So I was playing around with my free Sale-a-bration set I earned for meeting sales goals and came up with this card


I really like the table going off the edge of the focal layer, and the font from PTI Mega Mixed Messages just went with the style of the stamps (Scene in a Garden from the Occasions mini). I tried to put a little striping on the vase using my lightest C0pic. You can sort of see it (if you squint a lot and twist your head down and to the right )

I used these Copics (I'll have to work on my photog skills on these)


I used the B91 marker to dot the pussy willow buds in the vase too, but its pretty light. I had a hard time getting good shots of this card, but I really do like how it turned out in real life so I thought I would still show it.

Thanks for stopping by!

{Thanks card supplies}
Stamps: SU! Scenes from a Garden, PTI Mega Mixed Messages
Paper: (All SU!) Garden Green, Chocolate Chip, Not Quite Navy, Very Vanilla
Ink:Chocolate Chip, Garden Green
Other: Copic Sketch markers


Monday, May 4, 2009

Father's Day Stamp Camp project

I hold a monthly card making class at work over a lunch hour. We make 2 cards and its a great way to get together and get away from the pressures of work for a little while. Its been really fun and I've met some great people who are now very good friends. Its also quite interesting to watch engineers who are logical and straight-line thinking kinda of people pick up a stamp and do random background stamping. I've had people tell me "I can't do that" and not mean the stamping, but the random pattern creating.

This month we're going easy on the random and making a father's day project with Melissa Bickford's Men of Life stamp set


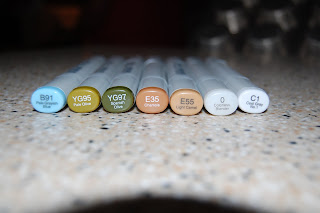
I've been playing around with this 4.25" square layout. I love that there is enough room to write a little note inside, but that you can overhang the focal layer and still fit in a standard envelope.

For this little guy, I stamped the boat and sails in chocolate chip, then paper pieced the sail in the manly striped patterned paper from SU!. I cut the image and layer using oval nesties. I tried to used the nestie as a mask and do a little coloring. It worked OK, but rubbing with a sponge tended to move the nestie so I got a little smearing at the top ... one more reason I need an air brush system ;o)

The sentiment was stamped in chocolate chip as well.

I finished it off with a punched circle of olive and some of the PTI aqua mist vintage buttons and dotted swiss ribbon I(I love dotted swiss ribbon!!)

Thanks for stopping by!

{Fathers Day card supplies - All PTI unless noted}
Stamps: Men Of Life
Paper: (All SU!) Baja Breeze, Basic Black, Naturals Ivory, Old Olive
Ink: Chocolate Chip
Accessories: Aqua Mist vintage buttons, aqua mist dotted satin ribbon, natural hemp (SU!)

Saturday, May 2, 2009

Spring Fling Challenge

I have a wedding shower to go to today. I helped make the wedding and shower invites and wanted to make a gift for the couple (Ryan's mom is a good friend from church). I bought them some things from their registry but wanted to give them something handmade too. I'll show the gift box another time (Its my entry in the My Timeless Templates Guest Star Stamper so I'll wait til that it announced before I post). But I made this card as well and figured I could show this.


The wedding colors are purple ... purple ... and purple and I was inspired by the purple flowers in the Spring Fling challenge of Kelly Lunceford.


I used Plum Pudding CS for the base and adhered Friends til the End patterned paper at the bottom (about 4.25" by 2.5"). I then machine stitched a straight stitch all around the front making about a 1/4" border.
(Thank You Michelle Wooderson for helping me overcome my fear of sewing on paper!)


Then I masked at the stitch line using Post-It notes and stamped the small blossom from Friends til the End in the upper part of the card.

(Thank you Dawn McVey for helping me overcome my fear of patterns and mixing patterns!)

I added a strip of Dark Chocolate CS and plum pudding dotted satin ribbon to hide the edge of the patterned paper.

A little blingy lavender rhinestones from Martha Stewart that I picked up at Mikes and a custom dyed fabric flower with a yummafalicious (my 16 yr old's favorite word) chocolate vintage button with chocolate twill tied in the center finishes it off.

I experimented with colors on the flower. First I tried Orchid Opulence from SU!, but that didn't blend well so i added some Perfect Plum ink to the mix and redyed it. I think it turned out pretty good!

Inside I continued the patterned paper and chocolate strip theme. I used a sentiment from Mega Mixed Messages ... my current go-to fave for sentiments.


Thanks for stopping by!

{Best Wishes card supplies - all PTI unless noted}
Stamps:Friends til the End, Mega Mixed Messages
Paper:Plum Pudding, Friends til the End patterned plum, Dark Chocolate, Very Vanilla (SU!)
Ink:Elegant Eggplant, Orchid Opulence, Perfect Plum (all SU!)
Embellishments: Fabric Flower (SU! Pretties), rhinestones (Martha Stewart), plum pudding dotted satin ribbon, dark chocolate twill.


Monday, April 27, 2009

Remember

In this post, I showed a card file and cards I made for a friend's mom.  Its with mixed emotions I made this card for my friend:
My friend's mom died on Thursday.  I say it is with mixed emotions, because her death was quite peaceful and pain-free, and in these cases that is what you want.  My friend is doing pretty well, since they did have time to prepare.  I'm sure it will be harder in coming weeks, once all the family goes back home and things aren't as hectic.  So I wanted her to have something to encourage her when that time comes.
The card base is 4.25" square.  That left me some room to overhang the focal layer and still fit in a standard envelope.  Inside I stamped a few more poppies and a swirl

{Remember card supplies - all PTI unless noted}
Stamps: Remember
Paper: True Black, Stampers Select White, Real Red (SU!)
Ink: (All SU!) Basic Black, Real Red Mellow Moss
Accessories: Pure Poppy dotted satin ribbon
Tools: Scalloped and regular square nestabilities, Big Shot

Saturday, April 25, 2009

Papertrey Blog Hop


I didn't have time to make anything new for the blog hop, but here is a collage of projects using Lauren's My Timeless Templates that I've made in the last month. I love these templates. They are so easy to use and so versatile. You can dress them up any way you choose. They are just fabulous!

This is the All Boxed Up template:
This is Filed With Flair
And finally the Desk Organizer and For Keep{sake}

Thanks for stopping by on the blog hop! Enjoy the rest of the fabulosity!